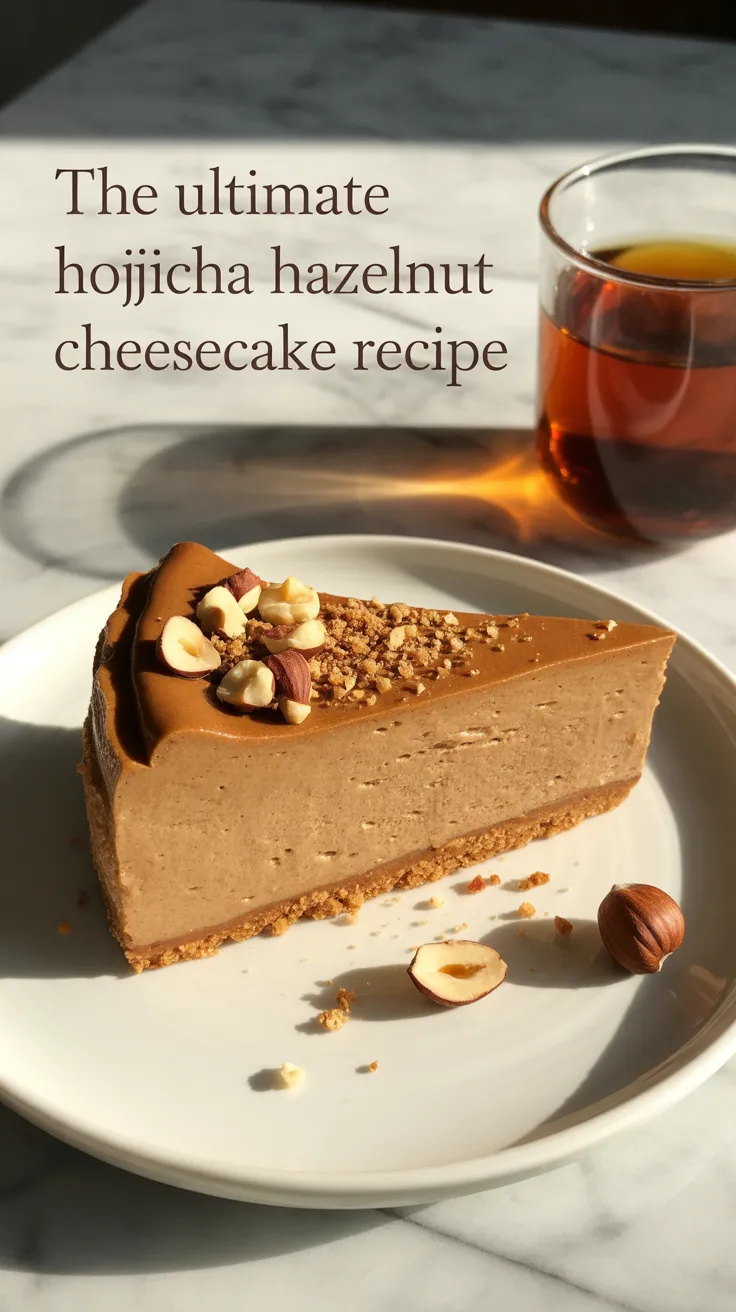
Imagine yourself sitting in a cozy cafe in Japan, surrounded by the warm aroma of roasted green tea and the sweet scent of freshly baked pastries. The air is filled with the sound of laughter and chatter, as you take a bite of the most decadent and delicious Hojicha Hazelnut Cheesecake. This delightful treat is a favorite in my family, loved for its rich and creamy texture, nutty flavor, and unique twist of Japanese green tea.
The History and Origins of Hojicha Hazelnut Cheesecake
Hojicha Hazelnut Cheesecake is a fusion of traditional Japanese flavors and Western dessert techniques. Hojicha, a type of roasted green tea, adds a smoky and earthy flavor to the creamy cheesecake, while the hazelnuts provide a crunchy texture and nutty taste. This delightful dessert is a perfect blend of sweet and savory, making it a popular choice for tea lovers and dessert enthusiasts alike.
Why You Should Make Hojicha Hazelnut Cheesecake
- Unique Flavor Profile: Hojicha adds a distinct smoky flavor to the cheesecake, making it stand out from traditional desserts.
- Creamy and Rich Texture: The combination of cream cheese and hazelnuts creates a velvety smooth texture that melts in your mouth.
- Easy to Make: This recipe is simple and straightforward, perfect for both beginner and experienced bakers.
- Ideal for Special Occasions: Hojicha Hazelnut Cheesecake is a show-stopping dessert that will impress your guests at any gathering or celebration.

Ingredients
- Cream cheese (softened) – 16 oz: Adds richness and creaminess to the cheesecake.
- Sugar – 1 cup: Provides sweetness to balance the flavors.
- Eggs – 3: Helps bind the ingredients together and create a smooth texture.
- Hojicha powder – 2 tbsp: Infuses the cheesecake with a unique roasted green tea flavor.
- Vanilla extract – 1 tsp: Enhances the overall flavor of the cheesecake.
- All-purpose flour – 2 tbsp: Helps thicken the cheesecake batter.
- Crushed hazelnuts – 1/2 cup: Adds a crunchy texture and nutty flavor to the cheesecake.
Preparing the Ingredients
Before you begin making the cheesecake, make sure to bring the cream cheese to room temperature to ensure a smooth and creamy texture. In a separate bowl, whisk together the hojicha powder and flour to ensure even distribution in the batter. Crush the hazelnuts into small pieces for added crunch in every bite.
Cutting Techniques
When cutting the cheesecake into slices, use a sharp knife dipped in hot water to ensure clean and smooth cuts. Wipe the knife clean between each slice to prevent sticking and maintain the presentation of the cheesecake.
Kitchen Tools Required
To make Hojicha Hazelnut Cheesecake, you will need a springform pan for baking, a mixing bowl for combining the ingredients, an electric mixer for blending the batter, and a spatula for smoothing the top of the cheesecake. These tools are essential for achieving the perfect texture and consistency in your cheesecake.
Temperature and Timing Guide
Preheat your oven to 325°F (160°C) before baking the cheesecake. Bake for 45-50 minutes, or until the edges are set and the center is slightly jiggly. Allow the cheesecake to cool completely before refrigerating for at least 4 hours to set.
Common Issues and Solutions
- Cracked Cheesecake: To prevent cracking, avoid overmixing the batter and bake the cheesecake in a water bath to create a moist environment.
- Soggy Bottom: To prevent a soggy bottom, bake the cheesecake on a preheated baking sheet to ensure even heat distribution.
- Burnt Top: To prevent burning, cover the cheesecake with foil halfway through baking to protect the top from excessive browning.

Instructions
- Preheat Oven: Preheat your oven to 325°F (160°C) and grease a 9-inch springform pan.
- Mix Ingredients: In a mixing bowl, beat the cream cheese and sugar until smooth. Add the eggs one at a time, then mix in the hojicha powder, vanilla extract, and flour until well combined.
- Stir in Hazelnuts: Gently fold in the crushed hazelnuts until evenly distributed in the batter.
- Bake Cheesecake: Pour the batter into the prepared pan and smooth the top with a spatula. Bake for 45-50 minutes, or until the edges are set and the center is slightly jiggly.
- Cool and Refrigerate: Allow the cheesecake to cool completely, then refrigerate for at least 4 hours to set before serving.
Tips for Perfect Results
For a smoother texture, avoid overmixing the batter and be sure to bring all ingredients to room temperature before mixing. To enhance the flavor, sprinkle additional crushed hazelnuts on top of the cheesecake before serving. Enjoy this delightful dessert with a cup of hot hojicha tea for the ultimate indulgence.

Alternative Ways to Customize the Recipe
- Chocolate Drizzle: Add a decadent touch by drizzling melted chocolate over the cooled cheesecake.
- Whipped Cream Topping: Top the cheesecake with a dollop of whipped cream and a sprinkle of hojicha powder for added flair.
- Fruit Compote: Serve the cheesecake with a side of fruit compote, such as raspberry or strawberry, for a refreshing contrast to the rich flavors.
Final Thoughts
Indulge in the delightful flavors of Hojicha Hazelnut Cheesecake and treat yourself to a unique and satisfying dessert experience. Whether you’re a fan of Japanese cuisine or simply looking to try something new, this recipe promises to impress with its rich textures and unique flavor profile.
Each bite brings a taste of roasted green tea perfectly balanced with the nuttiness of hazelnuts, creating a memorable dessert that’s ideal for any occasion. Elevate your baking repertoire and enjoy the satisfaction of creating a show-stopping cheesecake that will leave your guests in awe. Don’t miss out on this delicious fusion of tradition and innovation!